Showing posts with label recipe. Show all posts

Sunday, 20 March 2016

RECIPE - HASSELBACK POTATOES

Sunday, 20 March 2016

Prepare for the ultimate potato recipe! These hasselback new potatoes are one of the yummiest things I have made and I want to share the recipe with you all. Get prepared to feel stuffed because once you start eating you won't be able to stop!

Ingredients

1 Bag of New Potatoes
Olive Oil
5 Rashers of Streaky Bacon
1 Tub of Sour Cream
A Bunch of Parsley

Method

Preheat the oven to 200°c.
Put a good glug of olive oil on a lined baking tray and heat it in the oven.
To slice the new potatoes place them one at a time in the dip of a wooden spoon and gently slice the potato at 2/3mm intervals.
Take the hot oil out of the oven and add the potatoes spooning over the oil to cover them. 
Season the potatoes and bake in the oven for 40 minutes - 1 hour so they're nice and crispy. 

Meanwhile, cut the bacon in to small pieces and fry until crispy.

Once the potatoes are done take them out of the oven and let them briefly cool. 
Add the crispy bacon, a small spoon of sour cream, sprinkle over the chopped parsley and you're good to go! Enjoy!

Thursday, 17 March 2016

MY TWO FAVOURITE THINGS

Thursday, 17 March 2016
A while ago I made my gorgeous Mum a cake for her birthday which combined my two favourite things: food and flowers. 

I made a floral wreath using oasis, foliage from the garden and some beautiful red roses. After soaking the oasis I just add the foliage piece by piece until it's covered and then add the flowers. I'm by no means a pro but there are loads of tutorials online like this and this

My oasis wreath was the perfect size for a standard cake so I simply popped it on top of my victoria sponge and ta daa! The effect was really dramatic and it's a great way to jazz up a cake without icing. I particularly love it because you can use it as a table decoration after you've eaten the cake so it's like two presents in one! 

This is quite a wintery design but in the summer you could add peonies, pink roses or hydrangeas to make it nice and bright.

Let me know what you think!

Friday, 11 March 2016

RECIPE - 3 INGREDIENT PANCAKES

Friday, 11 March 2016

I often post recipes for cakes and yummy treats so I thought I'd share something a little less indulgent but just as tasty. These are my 3 ingredient pancakes packed with protein, nutrients and yumminess. 

All you need is a banana, 2 eggs and a sprinkle of chia seeds.

The chia seeds aren't essential but I think they help with the consistency of the mixture!

Place all the ingredients in a blender and blend in to a smooth batter like consistency. 
Melt a little butter in a pan on a medium heat and pour in a ladle of batter.
Cook for a minute or so, flip and repeat.
Continue until all the mixture is gone.
I like to serve them with fresh fruit, my raspberry coulis and a sprinkle of dark chocolate.

I was so excited the first time that I made them that I was taking an unprecedented amount of snapchats! 


You really won't believe how tasty they are until you try them so get flipping! If you want to stick to traditional pancakes I have a great recipe here.


Saturday, 5 March 2016

RECIPE - MUSTARD CHICKEN

Saturday, 5 March 2016
If you fancy a delicious meal in, this is the dish for you! I've slightly adapted Jamie Oliver's Recipe and swapped his dauphinoise for my own recipe to make the meal perfect! Take a look at the recipe below...


Ingredients

1kg Maris Piper Potatoes
A Knob of Butter
3 Cloves of Garlic
225ml Single Cream 
Salt & Pepper

4 Chicken Breasts with the Skin On
4 tsp of Mustard Powder
A few Sprigs of Thyme
Olive Oil 
2 Cloves of Garlic
2 Leeks
A Splash of White Wine
75ml Single Cream
1 tsp Whole Grain Mustard

A Bag of Swiss Chard/Spinach or other Greens

Method

Preheat the Oven to 180°c

Dauphinoise

First get the Dauphinoise on the go...
Peel the potatoes and slice as thinly as you can (I use the slicing attachment on my food processor to speed up the job!)
On a low heat, melt the butter in a large pan and add the garlic and some seasoning 
Next add your sliced potatoes and stir until they're all coated
Tip them out in to a baking dish and pour over the cream
Make sure the potatoes are flat and evenly arranged and pop them in the oven
I would say you need to leave them in for 1 1/2 to 2 hours to make sure they're soft and delicious but just keep an eye on how browned the top is!

Chicken & Greens

Season the chicken with the mustard powder some salt and pepper
Pull off the thyme leaves and sprinkle them on. Add some olive oil and massage in the seasoning
Place a pan on a medium heat with a glug of olive oil and place the chicken in skin side down
Cook for about 10 minutes and then flip the chicken and cook for another 5
Crush the garlic in to the pan and cook for a couple more minutes before you add the leeks
Pop the greens in a boiling pan of water for a few minutes and once drained add butter and seasoning
When the leeks begin to soften add the wine and cook the leeks down
Add your mustard and the cream and simmer for a few minutes longer
You're all ready to serve so take out the chicken and pour the sauce on a platter
Slice the chicken place on top and tuck in!


Tuesday, 2 February 2016

BIRTHDAY BAKING

Tuesday, 2 February 2016

This weekend I got busy in the kitchen and made a birthday cake for my Grandad. Perhaps more style over substance(!), I topped the lemon and raspberry sponge with fresh flowers, meringues and fruit. I also used some straws and coloured paper to make a DIY bunting topper to add a special touch! I adapted several recipes from across pinterest to get just what I wanted so take a look below if you want to recreate this cake.


Ingredients:

Sponge:
375g Unsalted Butter
375g Golden Caster Sugar
375g Self Raising Flour
6 Eggs 
Rind from 1 Lemon
A Splash of Milk

Filling:
Lemon Curd (I used this one)
1 Punnet of Raspberries
1 teaspoon of Icing Sugar

Buttercream:
500g Icing Sugar
250g Butter
Juice from 1 Lemon

Additional Toppers:
Fresh Flowers
Fresh Fruit (Raspberries and Cherries)
Meringue Kisses
Cake Bunting
Sparkler Candles

Method:

Sponge:
Prep - Line and grease three 20cm cake tins and preheat the oven at 180°C.

1) Cream together the butter and sugar until light and fluffy.
2) Add the eggs one at a time mixing well between.
3) Fold in the flour and lemon rind until smooth.
4) If necessary, loosen the mixture with a splash of milk.
5) Divide the mixture between the tins and spread it to the edges.
6) Put in the oven for 20-25 until the cake springs back when touched.

Buttercream:

Whilst waiting for the sponges to bake you can prep the fillings. 

1) Soften the butter and mix together with the icing sugar and the juice from 1/2 a lemon.
2) Adjust the consistency using lemon juice and icing sugar and set aside until the cakes have cooled.

Fillings:

You also need to prepare the Raspberry Filling.

1) Simply place the raspberries in a small pan with 100ml of warm water and simmer for 5-10 minutes.
2) Once they have a thicker consistency, remove from the heat and pass the mixture through a sieve.
3) Use the back of a spoon the squeeze all of the juice from the raspberries and make sure all of the pips are removed.
4) Add the teaspoon of icing sugar to the raspberry coulis and set aside.

Assembly:

1) Once the sponges have cooled layer your first sponge on your plate or cake board.
2) Add a layer of the lemon buttercream and smooth it across the top (I'd recommend leaving a space around the edge so it doesn't spill out).
TOP TIP: make the edges of your buttercream a little higher than the centre so it acts as a well for your other fillings!
3) Spread a tablespoon of lemon curd across the buttercream and top this with a layer of the raspberry coulis.
4) Repeat these steps until you've got all three layers. I then popped my cake in the fridge for 20 minutes or so to let it firm up before I covered it. 
5) Use the remaining buttercream to cover your cake. It's best to use a palette knife for a smooth finish but a spatula also works. 
6) Top your cake with all of your wonderful toppings and you're ready to go!

This cake is wonderful for a celebration and is really fun to make. I hope you have a go yourself and let me know what you think!

Sunday, 17 January 2016

GREENERY

Sunday, 17 January 2016

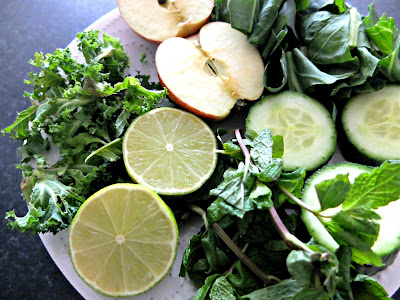
I bought a juicer a few months ago and found a love for everything green! I used to be a bit wary of green drinks but have found that these juices give me a much needed vitamin boost in the cold winter months. Whilst store bought juices are great I love making juices at home because they're much fresher and often better value. Take a look at the recipe below. 


Ingredients:

A handful of kale
A handful of leafy greens (spinach, chard etc.)
1 small apple
1 lime
A few stalks of fresh mint

Method:

Simply put all of your ingredients in the juicer (I use a kitchen aid juicer but have heard great things about Kuvings too) and wait for them to juice. 

My juicer already comes with a strainer but if yours doesn't I always like to get rid of the pulp so simply sieve it to make sure your juice is smooth.

Pour the juice over plenty of ice and enjoy!

This juice is really delicious and is perfect for a quick breakfast or a pick-me-up on the go. If you want to save time in the morning you can always make it the night before but make sure to store it in the fridge and drink it as soon as you can! 

Wednesday, 22 October 2014

RAINBOW

Wednesday, 22 October 2014

Recently, I made this rainbow cake with my flat mate for her boyfriend's birthday. It was so fun to make and surprisingly easy to do the decoration! We just covered the cake in buttercream and then added smarties colour by colour starting in the middle. To finish it off we just stacked chocolate fingers around the edge of the cake. I think for such a simple method it was a really cool cake! You should all give it a go! 

Wednesday, 1 October 2014

DIY RECIPE - QUINOA STUFFED COURGETTES

Wednesday, 1 October 2014

I've recently tried this recipe for stuffed courgettes and it's one of my new favourite meals! Quinoa is the perfect substitute for rice when stuffing vegetables and I love courgettes so this recipe is perfect from me. You should give it a try too! Here is how I did it:

Ingredients

2 Courgettes (Zucchini)
100g Cooked Quinoa
1/2 a Red Pepper
1 Shallot
1/2 a Packet of Mozzarella
1 Crushed Garlic Clove
A Few Basil Leaves
2 tsp Lemon Juice
A Sprinkling of Parmesan Cheese (optional)
Seasoning and Olive Oil

Method

1) Start by cutting your courgettes in half and removing the ends. Then scoop out the seedy part of your courgette so they're ready to be loaded with filling.

2) If you haven't already, cook your quinoa according to the packet instructions and add to a bowl.

3) Then finely dice your red pepper, shallot and mozzarella and combine with the quinoa.

4) To this, add your crushed garlic clove, roughly chopped basil leaves and lemon juice and mix it all together. Season to taste.

5) Now you need to put your oven on the grill setting at a high temperature and while thats heating up begin to stuff your courgettes. Place them on a baking tray, pack the filling in to the hole you scooped out and press the mixture down. 

6) Once you've filled your courgettes you can sprinkle them with parmesan cheese for an extra cheesy crunch.

7) Put your courgettes under the grill and cook until they are soft (roughly 10 minutes). Make sure you keep an eye on them and turn the grill temperature down if they are getting too brown.

8) Enjoy!

I love this recipe and think it's a great healthy dinner option. I hope you give it a go!

Saturday, 13 September 2014

RECIPE - FLIPPING GOOD PANCAKES

Saturday, 13 September 2014

Pancakes are my favourite weekend breakfast treat so I thought I'd share my simple recipe with you all! This recipe is for basic English pancakes so they're more like crepes than American pancakes.

Ingredients:

110g Plain Flour
2 Eggs
200ml Milk
75ml Water
Ingredients of your choice to serve (I would recommend Lemon and Sugar)!

Method: 

Add the flour and eggs to a bowl and stir to create a thick mixture. I would recommend using a fork rather than a whisk as it just seems to combine the two better!

Then measure the milk and water in to the same jug and begin to add the liquid to the flour and egg mixture. Do this bit-by-bit stirring in between to make sure you don't get any lumps. Continue until all of the liquid is incorporated and you should have quite a runny batter

Now put a frying pan on a medium heat and grease it with a little vegetable oil or butter using kitchen roll. This will ensure there isn't too much oil in the pan. 

Once the pan is hot add around half a ladle of batter and use the back of the ladle to spread the batter in to a circle. Once the pancake is golden brown (you will see bubbles forming) flip it over and cook the other side. The pancakes should take a few minutes to cook.

Continue to cook the pancakes until you've used all of your batter. Keep the cooked ones warm in the oven! I would recommend serving them the English way with sugar and lemon but they're also really tasty with mixed fruit, chocolate and maple syrup toppings! They make the perfect weekend treat so enjoy!

Tuesday, 26 August 2014

RECIPE - THE ULTIMATE BROWNIES

Tuesday, 26 August 2014

I searched the internet for the perfect chewy chocolate brownie recipe and have latched on to this recipe at Inspired Taste. I've made these brownies several times and, as you can see, this time I made quite a big batch! I trade the nuts for white and milk chocolate chips to make the ultimate chocolately treat. You can also try adding a bit more salt to make them perfect with ice-cream for dessert. If you love fudgy brownies then these are definitely for you!

Helpful Hint - If the mixture looks split at any time don't panic! Once you add the flour you'll have the perfect gooey batter. 


Sunday, 11 August 2013

DIY RECIPE - BERRY GOOD PAVLOVA

Sunday, 11 August 2013


INGREDIENTS

6 Egg Whites
A Pinch of Salt
450g Caster Sugar
1 1/2 Teaspoons Vinegar 
1 1/2 Teaspoons Vanilla Essence
1 Tub of Double Cream
Fruit Filling of Choice (e.g. Strawberries/Raspberries)

METHOD

Gas Oven - Preheat to 230 Degrees Celsius (drop this temperature to 150 Degrees just before cooking)
Electric Oven - Preheat oven to 150 Degrees Celsius 

Beat the egg whites with the salt until you can create soft peaks. Once at this consistency, begin to add the sugar, a tablespoon at a time, beating well after each tablespoon. Stop beating when you have added the final tablespoon of sugar. Then lightly fold in the vinegar and vanilla. 

Line a baking tray with greaseproof paper and brush with oil. Empty the pavlova mixture on to the greaseproof paper and spread it outwards in to a circular shape creating a small dip in the middle (this makes room for your filling).

Place the Pavlova in the oven (remember to reduce the heat if using a gas oven!) and bake for 40 to 50 minutes until crisp and a pale golden colour. Turn off the oven heat and leave there until cool.

Once cool, remove the pavlova from the oven.To fill the Pavlova, whip the cream and place it in the centre dip. Then top with your choice of fruit and voila! 

Enjoy! 


LAWLESS LIFESTYLE © 2014